Component Objects
Component Object Properties
Component Object Properties are the control settings available for each audio or video component. The availability of audio or video components is dependant on the partition type currently active in the layout.
These audio objects represent the same settings normally found on equivalent analog audio hardware products. Component Object Properties can be copied & pasted (as DSP Data) between components of the same type, using the Edit Menu. However, once a Component Object is placed into the Layout, all available settings can be accessed by double-clicking over the object. This produces a Control Dialog Box, which displays the component controls in a more conventional user interface.
There are multiple audio and video Component Object categories, with some categories providing several component variations. Each component type will have a unique Control Dialog Box. For more information on Control Dialog Boxes for specific components, select the desired category from the list below.
Customizing Component Objects
Component Objects can be customized in several ways. First, when using the Object Toolbar to place components into the Layout, certain components will present the user with a pop-up ‘Initialization Properties’ window of configuration options. Several pre-defined configuration (input/output) options may be available for the component, as well as a 'custom' selection that allows the user to more specifically configure the component. Some components (such as Auto Mixers) allow activation of additional features (such as Logic Inputs & Direct Outputs). Multiple channels of Level, Invert, & Mute may be 'ganged' onto a single control. Multi-channel Invert and Mute Buttons may be set for 'horizontal alignment' and/or 'no labeling' when minimized as a user control. The configuration of certain components can be further edited, even after they have been placed in the Layout and the design has been compiled.
Actual component settings can be customized through Control Dialog Boxes (see Component Object Properties).
Control Dialog Boxes for certain Combiners, Dynamics, Controls, Meters, & Telephone Interface components can be minimized to create customized control surfaces (room combiners, meters, level controls, mute buttons, preset buttons, telephone dialers, etc.). These control surfaces can then be made user accessible, with other system components hidden on Layers which are invisible to the user, and which are Password protected. (See Layout Property Sheet.)
Multiple component objects may be merged together using the Custom Block specialty component. Custom Blocks can simplify the design process by integrating frequently used component combinations, and can provide password protection for intellectual property such as unique processing and component settings.
Live Control of Component objects
Component objects have a control dialog to allow real time adjustment of any audio controls. To open the control dialog, right click the object to open the context menu and select Control Dialog, or double click the component object in the layout.
Min Max volume range
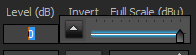
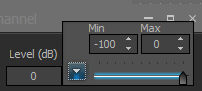
Most component objects that use a volume control also allow a minimum (min) and maximum (max) setting to be specified. When offline this can be adjusted in the DSP properties of the Object_Property_Sheet. The control dialog will also have text boxes that allow user adjustment, on some dialogs such as output blocks or mixers, there is an 'expand/collapse' button that reveals more controls.
The following blocks support this functionality:
- Input and Output: AVB Input, AVB Output, Analog Input, Analog Output, Attero Tech Wall Plate, EX-UBT / EX-USB, Parlé Microphones, SHURE, Mic, Audio-Technica Mic, CobraNet Input, CobraNet Output, Dante Input, Dante Output, USB Input and Output, AEC Input (processing Block), Telephone Interface Receive and Transmit, VoIP Phone Receive and Transmit, Lab.gruppen Amplifier, Tesira Amplifiers - Rack Mount, Tesira Amplifiers - Plenum
- Crossovers: Crossover Input and Output
- Mixers: Gating Auto Mixer, Gain Sharing Auto Mixer, Standard Mixer, Matrix Mixer, Room Combiner
- Equalizers: Parametric Equalizer, Graphic Equalizer
- Dynamics: Ducker (Input)
- Router: Source Selector
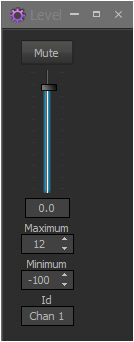
- Controls: Level
- Generators: Tone Generator, Noise Generator
Minimizing Control Dialogs
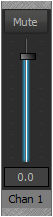
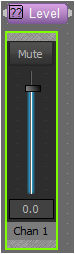
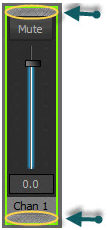
To aid system control during commissioning certain DSP object will show a compact control dialog when the Minimize icon on the top right of the control dialog is selected. Processing objects that support this functionality include: Level Mute Preset Button Signal Present Meter Audio Meter Dialer Tesira Amplifiers - Rack Mount, Parlé Microphones, AV Input AV Output
Fader showing Normal and Minimized View:
Minimized EX-UBT Bluetooth Control/Status dialog:

Double clicking the original control block in the layout will cause a minimized control dialog to display a highlight surround. Double clicking the grey area or using the right click context menu will allow the dialog to be restored.
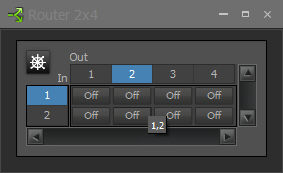
Mixer, Router and Matrix Cross-points
When a Mixer, Router or Crosspoint dialog is used moving the mouse over the crosspoints will highlight the current cross point location. The labels cell will change color following the mouse location and tooltip will appear to show the channel Input and Output name.